
Web Automation
Guides for authoring, running and analysing tests across web automation, API and performance — plus setup, collaboration and release notes.
Features
Features is a reference for the Web testcase details editor — the Test Steps panel on the left and the step details / Actions area on the right. Use this page to understand what each control does when you author or maintain a testcase.
Open a testcase from Web → Testcases (click the testcase name). For step-by-step authoring flows, see or .
Note:
Add, reorder, select, merge, and most step menu actions require Edit mode on the testcase details page.
Test Steps panel (left)
The left panel lists every step in the testcase with a total count. Click a step to load its name, actions, and settings in the step details panel on the right. During a Local Agent run, each step also shows live status (Running, Passed, or Failed).
Add steps
New steps can be added from the Test Steps panel header or from a step's context menu. Click + in the panel header to append a step at the end of the list. Adding steps requires Edit mode.
Select steps
In Edit mode, each step shows a checkbox so you can select one or more steps at once. Multi-select is used for bulk actions from the step menu (⋮), including Merge, Copy, Delete, and Create Step Group. Click a step name to select it for editing on the right; use checkboxes when you need to act on several steps together. At least two enabled steps must be selected before Merge is available.
Reorder steps
Change execution order by dragging a step up or down in the Test Steps list. Drop the step in the new position — the testcase runs steps from top to bottom in the order shown. Reordering is only available in Edit mode. Use this after recording or merging steps when the captured sequence does not match the flow you want to test.
Step menu (⋮)
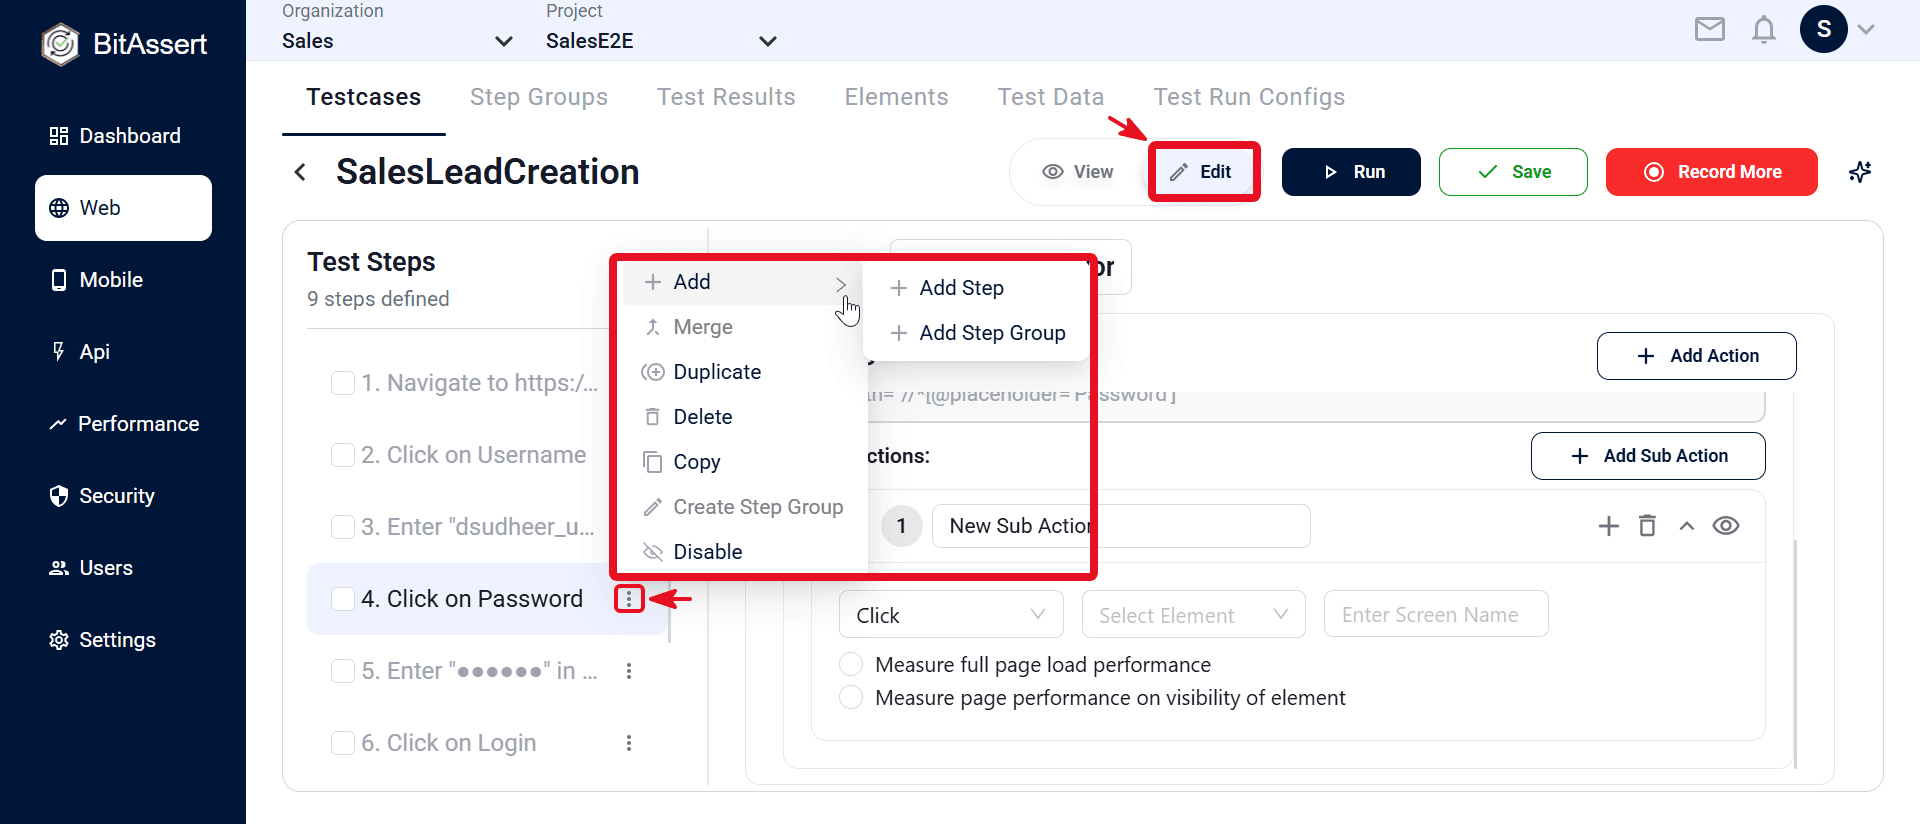
Add Step
Open the step menu (⋮) on any step and choose Add, then Add Step. A new empty step is inserted immediately after the step you opened the menu on. Use this when you need to add a step in the middle of a testcase without using the panel header + button. Requires Edit mode.
Add Step Group
From the same Add submenu, choose Add Step Group to insert a reusable step group after the selected step. Pick an existing group from your project — the testcase references that group instead of copying every action inline. When the group is updated, all testcases that reference it use the latest version. See .
Merge
Combines two or more selected enabled steps into a single step. Select steps using checkboxes in Edit mode, then open the step menu (⋮) on any selected step and choose Merge. All actions from the merged steps are combined into one step in order. Useful when recording created many small steps you want to run as one logical block.
Duplicate
Creates an exact copy of the current step and places it directly below. The duplicate includes the same step name, actions, and settings as the original. Use this when you need a similar step with only small changes — duplicate first, then edit the copy instead of building from scratch.
Delete
Removes the step you opened the menu on, or all currently selected steps if multiple are checked. Deleted steps are removed from the testcase permanently — use Disable instead if you only want to skip a step during runs. Confirm before deleting steps that contain many actions.
Copy / Paste
Copy stores the selected step(s) so you can reuse them elsewhere in the same testcase or another testcase. Select one or more steps, choose Copy, then open the menu on a target step and choose Paste to insert the copied steps after that step. Handy for repeating a login or setup block in multiple places.
Create Step Group
Turns the currently selected enabled steps into a new reusable step group. Select the steps you want to group, open the menu, and choose Create Step Group. You name the new group and those steps are replaced by a single step-group reference in the testcase. Other testcases can then reference the same group via Add Step Group.
Enable / Disable
Toggles whether the step runs during execution without deleting it. A disabled step appears dimmed in the Test Steps list and is skipped when you Run the testcase. The menu shows Disable for enabled steps and Enable for disabled ones. Use this while debugging flaky steps or temporarily bypassing parts of a flow.
Step types
- Regular step — contains actions you define.
- Step Group — references a reusable step group; expand to view inner steps (see ).
Step name
In Edit mode, rename the step in the header.
Step Group reference
- If the step is a step group, you see a reference message and View step group details to open the group in a new tab.
- Expand the group on the left and select an inner step to view its actions (read-only).
Actions (regular steps)
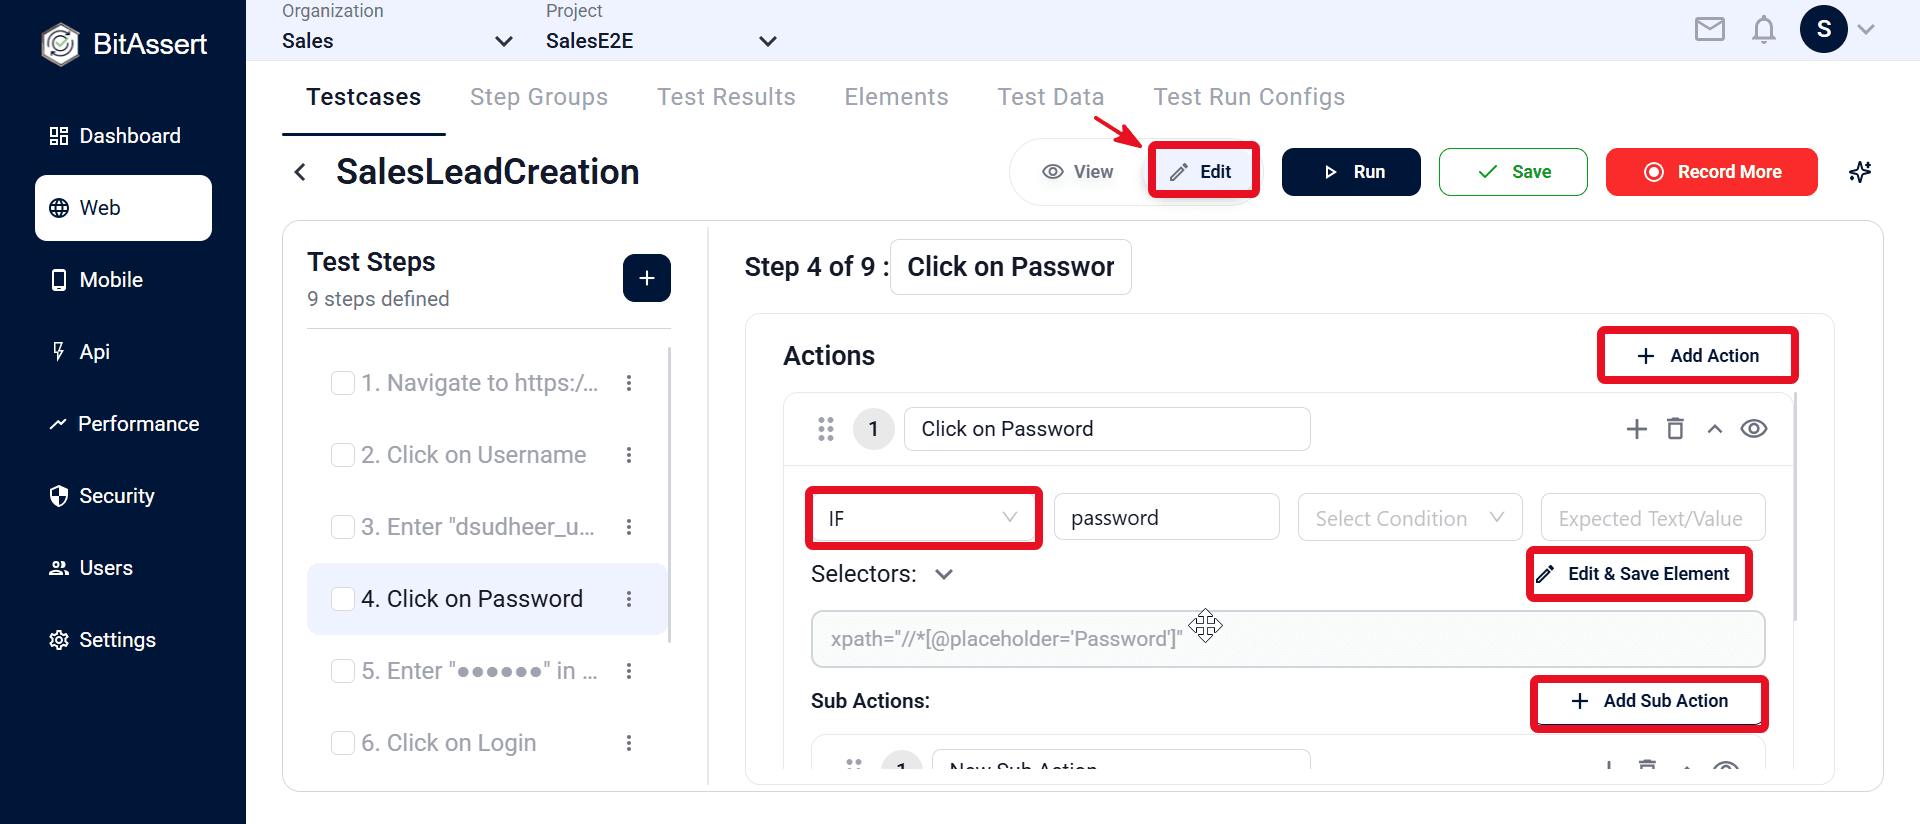
Add Action
Use + Add Action at the top of the Actions section to append a new primary action to the current step. A single step can chain several actions — for example, wait for a field, click it, then enter text — without creating separate steps in the Test Steps list. You can also insert an action after an existing one using + on the action row.
IF
Set Action Type to IF to run nested actions only when a condition is met. Choose the element, Condition (for example, visible or enabled), and value if required. This makes tests more resilient when the UI changes state — the main action and its sub actions run only when the condition is true.
Edit & Save Element
Expand Selectors to see how Bitassert locates the element — for example, xpath=//*[@placeholder='Password']for the Password field. Click Edit & Save Element to update locators and save them to the project element repository so other testcases and steps reuse the same definition. See .
Note:
Sub Actions are only available on IF and JS Expression actions. Other action types (Click, Enter, Navigate, Verify, and similar) do not show + Add Sub Action.
Add Sub Action
At the bottom of an IF or JS Expression action card, click + Add Sub Action to nest actions that run only when the parent condition passes. Sub actions use the same fields as main actions (Click, Enter, Verify, and so on). Add, reorder, enable, or disable them the same way as primary actions.
Managing actions
Drag action rows to reorder execution. Rename actions for clarity, expand or collapse action cards, and enable or disable individual actions without deleting them. Disabled actions are skipped when the step runs.
Action fields
Fields shown depend on the action type. Each type displays only what it needs.
| Field | Used for |
|---|---|
| Action Type | Click, Enter, Navigate, IF, Verify, and similar |
| Element | Actions that interact with UI elements |
| Screen Name | Screen or page for the element |
| Condition | IF actions (element state) |
| Input | Text, URLs, or test data (@{columnName}, ${__variableName}) |
| Wait Time | Wait actions (seconds) |
| JS Expression | Custom JavaScript for JS Expression actions |
| Selectors | Element locator values (view/edit) |
| Performance | Page load measurement (Navigate / Click) |
Supported action types (examples)
- Navigate To Url
- Click, Enter
- WaitUntil ElementVisible
- IF, JS Expression
- Verify Page Title, Verify Element Displays Text, and other verify actions
- Check / UnCheck CheckBox, Check RadioButton
Practical tips
- Use Enable/Disable to temporarily skip steps without deleting them.
- Select multiple steps before Merge or Create Step Group — at least two enabled steps are required for merge.
- Disable flaky steps during debugging, then re-enable after fixing locators in Elements.
- For data-driven inputs, use test data syntax (see ).
Expected outcome
You understand the testcase details editor layout — Test Steps on the left, step details and Actions on the right — and can use step menus, action fields, and element options while authoring or reviewing a Web testcase.